WordPress is a powerhouse with so many themes and plugins that allow you to build just about any kind of website. From eCommerce to a simple blog, WordPress has you covered. However, when choosing web hosting for WordPress, you should consider performance, security, and support in the first place.
Prerequisites
- You must first create an account with 1Byte and then purchase one of the Cloud Hosting packages.
- Note: Before following the instructions in this guide, you need to make sure that the email used on 1Byte is legitimate. Because critical information will be sent via email
6 Steps to Install WordPress Site on Cloud Hosting
Step 1. Get Login Detail From Your Email
Following The Purchase And Payment Of A Cloud Hosting Plan, You Will Get An Email With Login Details. If you don’t see the email in your inbox check the Spam folder.

In this demo, 1Byte uses the Cloud Hosting package: Basic
The 3 important pieces of information you need to pay attention to are:
- Login Details: Used to manage WordPress site based on a Web-based platform
- Terminal Information: Used to login via Terminal on a Web-based platform
- IP Address: In this demo, the domain named demo-cloud-hosting.com has the IP is 220.158.232.118
Keep this information private at all times. If you share this information with a third party, 1Byte will not be held liable.
Step 2. Configure The Domain Name
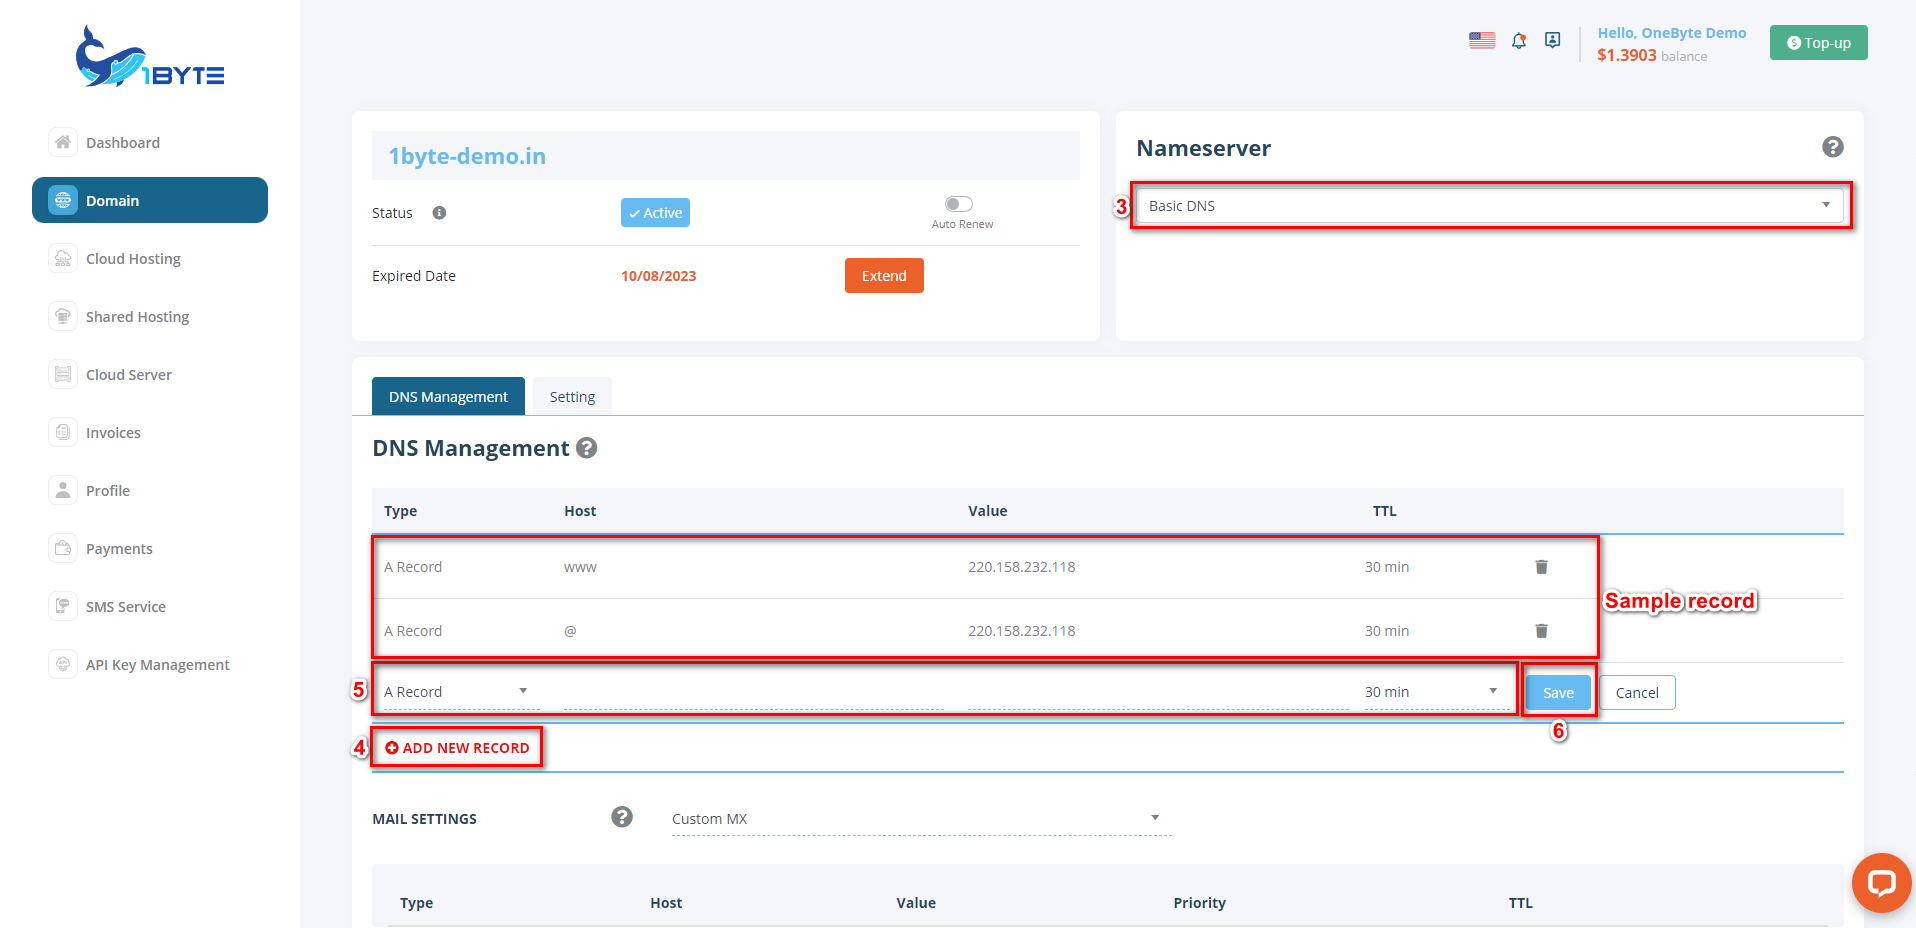
Configure the domain name by navigating to the Domain area of the Dashboard by clicking the following link – Domain

Click on Add NEW RECORD and add two records like the image and save

Step 3. Navigate To Cloud Hosting Dashboard
- Navigate to the Cloud Hosting area of the Dashboard by clicking the following link – Cloud Hosting
- Or You can go to the dashboard and click Cloud hosting after click aaPanel button

Finally, log in to aaPanel to prepare for the next steps

Step 4. Install Software Package
- 1Byte provides a lot of suggestions to the user by default. You’re free to make any changes you want.
- LNMP stands for: Linux system (L) + Nginx (N) + MySQL (M) +PHP (P)
LAMP stands for: Linux system (L) + Apache (A) + MySQL (M) +PHP (P)
You should keep in mind that Server 1Byte only supplies you with a minimal server by default (no auxiliary packages). As a result, this Server is not yet capable of serving as a Web server. Consequently, you must install LAMP or LNMP. In this demo, 1Byte will choose based on suggestion (LNMP with One-Click)

- (It will take some time for this installation to be completed. The speed of the installation will be quick or sluggish depending on the Cloud Hosting package that you choose. More CPU and RAM means a quicker installation process.)
- So if you don’t see the recommended software package you can go to Appstore and search this software one by one
Step 5. Add a Site for WordPress
Navigate to the “Website” sidebar menu on the Web-based platform

Follow the instructions as shown above. Remember to note your database credentials

Once you see this pop-up, it means Cloud Hosting has received the Domain Name)
Remember that at this time, your Cloud Hosting:
- Has LNMP architecture
- Has complete functionality of 1 Web Server
- Has received a Domain Name (In this article is demo-cloud-hosting.com)
- However, in order to access all of WordPress’s features, you must first install the WordPress platform on your Cloud Hosting
- Don’t forget to change the default website

Step 6: Install WordPress
6.1. Go to the WordPress homepage and copy the download link
- At this time, 1Byte will install WordPress version 6.0.2 This version may change in the future.)
- You can copy the link below
https://wordpress.org/latest.zip
6.2. Navigate to your website root in a Web-based platform

6.3. Download file WordPress
- Please go to the correct directory containing your domain name

6.4. Unzip the WordPress zip file

- If everything works properly, the WordPress Zip file will appear in the domain name’s folder.
6.5. Copy File from Extracted WordPress Directory
- Go inside the extracted WordPress directory. Copy all files outside the directory containing your domain name or Cut all files inside the extracted WordPress directory

- Paste them into the directory containing your domain name

6.6. Access to your domain
- When you access your domain – in this demo is 1byte-demo.in, it will appear like the image above. This implies you’ve installed WordPress on Cloud Hosting successfully. Now, configure it before putting it to use.
- Select your Language

- Click “Let’s go!” for the next step

- If you do not remember the database creation information in Step 5. You can find the database name, username, and password under the “Database” sidebar menu.

- Click “run the installation”

- Fill in the information about your site and note your username and password to login your site

- You are done with installing the WordPress site. Click ‘Log In’ to log in to Dashboard and proceed with configuring plugins and themes for your site.

- Provide the username and password that we have entered previously to log in for the first time.

- Congratulations! Your WordPress website is installed and ready for you to customize according to your requirements.

Conclusion
WordPress is the most popular content management system, and we learned how to install it using 1Byte’s cloud hosting. You can now proceed to build your website with it.

